


SensorGraph using android, amarino and arduino
BUILDCIRCUIT.COM HAS RELEASED A DIY SHIELD FOR AMARINO, CHECK THIS OUT.
This tutorial is for novices who have never made any Android application or worked with Amarino. If you have never done any experiment with Android and Arduino, start with the this experiment.
We need the following components/equipments for SensorGraph experiment:
a. Android Smart Phone- I am using ZTE Blade. Any kind of Android phone should work.
b. Arduino Duemilanova ATmega 328
c. Eclipse IDE for Java EE Developers
d. Androidsdk
e. Amarino Toolkit
f. Bluetooth Modem – BlueSMiRF from sparkfun or any other Bluetooth Adapter(recommended). BUY ONE
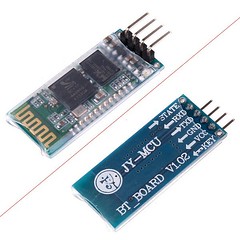
This Bluetooth adapter is a low choice for Arduino- Bluetooth experiments.
g. Potentiometer, Temperature Sensor, Light dependent resistor any other kinds of variable resistor- You can read more about using variable resistors and temperature sensors at http://www.buildcircuit.com/how-to-use-variable-resistor/
Step 1 Install Amarino
Go to http://www.amarino-toolkit.net/ and download the following applications on your mobile phone.
a. Amarino – Android Application– to be installed on phone.
b. Amarino Plug-in Bundle– to be installed on phone.
c. Amarino Library– To be kept in computer- needed to installing the application
Step 2 Download Meet Arduino Library
Download the MeetAndroid Library and place it into the libraries Folder Arduino.
After placing the folder into the libraries folder, you should be able to access all the Amarino files through the Arduino programming environment.
You can see the picture below(Click on the image to enlarge it):

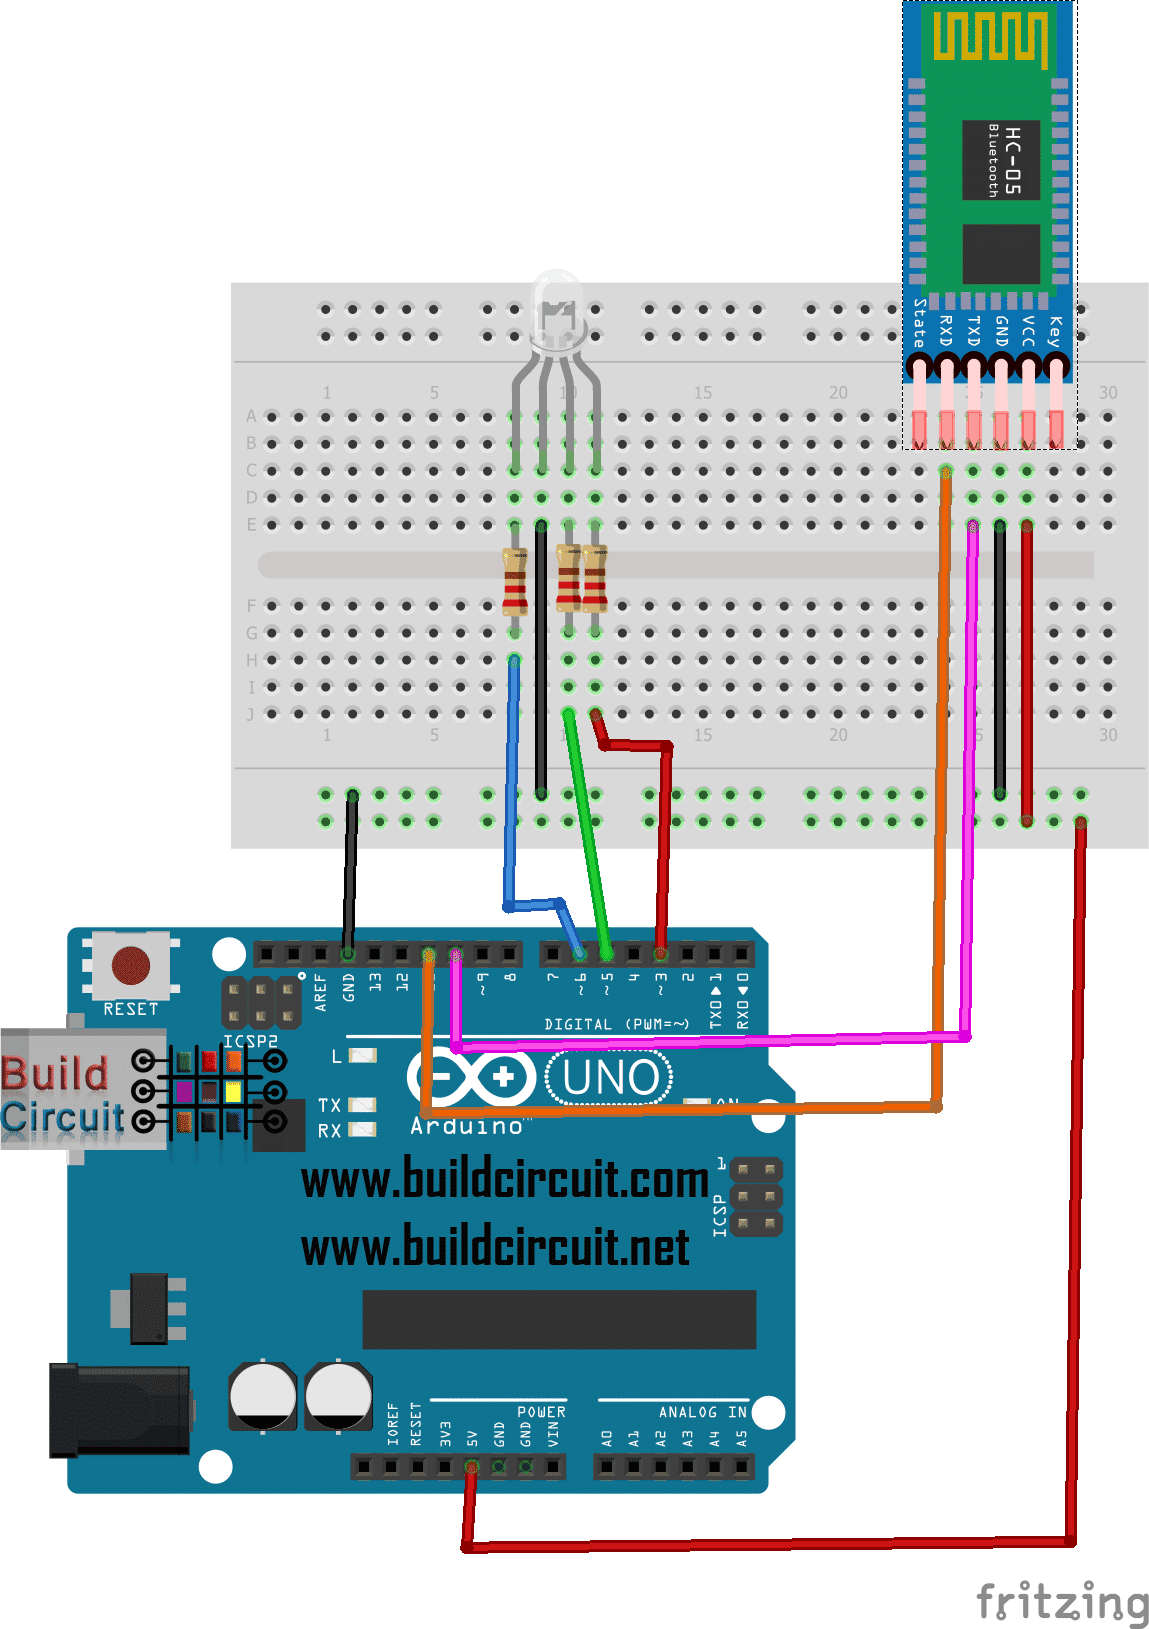
Step 3 Set up Bluetooth adapter
For this experiment, you can either use BlueSMiRF Bluetooth module (from sparkfun) or a general Bluetooth module from www.buildcircuit.net.
Amarino is perfectly compatible with both of these modules. BlueSMiRF adapter is expensive than the general one, so, I recommend to buy the general one.
Connect the Bluetooth adapter in the following way:
Step 4 Test the communication between Bluetooth adapter and Arduino
Step 5 Set up Eclipse
Step 6 Download the SensorGraph folder
Step 7 Work on SensorGraph
NOTE: you need to already have Androidsdk plugin installed.

– Select ‘create from existing source’.
– Use the browse button to find your Sensor Graph folder that you just downloaded.
– Select android 2.1 OR any other versions as the targeted device from the list. It depends upon the phone you use.
Click Finish.
*You might get yellow exclamation warnings next to your sensor graph project, it doesnot affect your project, so, just ignore it.
*If you have a red “X” you might need to make you have your “AmarinoLibrary_v0_55.jar ” file is included. Download it from http://www.amarino-toolkit.net/index.php/download.html
*To include the file right click on your SensorGraph folder and click build path > configure build path > libraries > add external jar > and browse for the AmarinoLibrary_v0_55.jar file. > ok

**Very very Important- Open the SensorGraph.java file in Eclipse and place your bluesmirf device number inside this line of code ( private static final String DEVICE_ADDRESS = “YOUR BLUE TOOTH DEVICE NUMBER”;)

** Changing AndroidManifest.xml file. Go to Application and set Debuggable as ‘True’.

Phone side (HOW TO INSTALL THE APPLICATION)
Your phone should already be connected via usb to your computer, In your phone settings, developer debug mode, and install from unknown sources checked.
In my phone, it was in settings>applications>USB debugging.


Next, right click on your SensorGraph folder and > Run as Android Application.

When the dialog box of the AVD manager launches select your phone as the targeted device. It will be the one that does not say emulator and probably have some device number to it.
Launch
This will install the SensorGraph app to your phone and run it.
NOTE: If your application does not install on the phone, then there is a possibility that your phone’s device driver is not installed on computer. Go to Device manager and install the driver for your phone. If you have internet connection, it searches automatically for the driver. You can get more information from here: http://developer.android.com/guide/developing/device.html
Arduino Side
You can get Arduino code file on one of the folders of Sensor Graph. Set the same baud rate that you have in Bluetooth adapter.
While uploading the sketch to Arduino, remove the RX and TX connections of Bluetooth module.
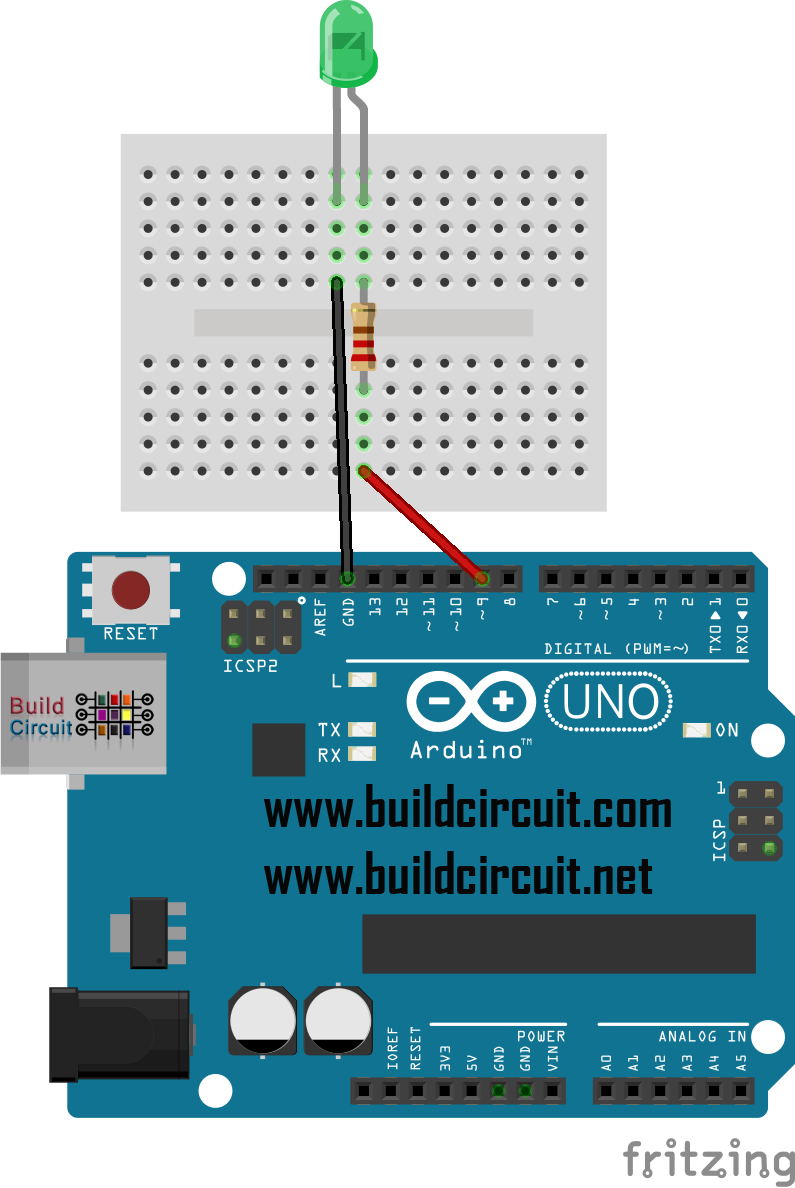
Then make a simple circuit using LDR, variable resistor or thermistor. In the picture below, I have used LDR(light dependent resistor).

If you have never done this kind of experiment before, I recommend you to do this experiment first: http://arduino.cc/en/Tutorial/AnalogReadSerial
-After uploading the sketch and fixing the circuit, connect the bluetooth module. Connection of bluetooth module has been described earlier in this tutorial.
If you follow the instructions carefully, your application will work. Please write me if you have any problem. You can watch the output on the video.
Check your experiment
1. Did you edit the MAC address?
2. Did you set ‘Debuggable’ as True in AndroidManifest.xml ?
3. Did you see if the baud rate written in your Arduino program is same as baud rate of Bluetooth adapter. If you are not sure about the baud rate, you can check it, see the following tutorial.
Please note that the baud rate of general Bluetooth adapter is always 9600bps.
4. Did you connect the Bluetooth module in the correct way?
READ ABOUT SENSOR GRAPH WITH CUSTOM BLUETOOTH ID
BUILDCIRCUIT.COM HAS RELEASED A DIY SHIELD FOR AMARINO, CHECK THIS OUT.
I can use Arduino uno for this project right?
yes, you can also use Arduino UNO for this project.
how can i use two bluetooth devices for this example?
i successfully run it with each one bt device but when i try to connect two,again only one is connected and a message for pairing of the second device is arised.when i pair it, still a message like ‘cannot establish connection’ is shown.
in the code i just add
private static final String DEVICE_ADDRESS1 = “…”;
private static final String DEVICE_ADDRESS2 = “…”;
Amarino.connect(this, DEVICE_ADDRESS1);
Amarino.connect(this, DEVICE_ADDRESS2);
Amarino.disconnect(this, DEVICE_ADDRESS1);
Amarino.disconnect(this, DEVICE_ADDRESS2);
any ideas??
thanx
When I create this project and run it on my Android device, as soon as it runs it Force Closes!
Do you know why?
My android version is 2.3.3
Thanks.
Mine says Conversion to Dalvik format failed with one Error.. what error I cant figure out
Same comment as Mat, Sensorgraph crashes Amarino 2.0, forces close. Here’s the fatal exception from Eclipse:
09-06 13:44:05.559: ERROR/AndroidRuntime(23809): java.lang.IllegalArgumentException: 00:07:80:99:57:f3 is not a valid Bluetooth address
There’s a series of ats below it, including:
09-06 13:43:23.801: ERROR/AndroidRuntime(23779): at android.bluetooth.BluetoothDevice.(BluetoothDevice.java:371)
09-06 13:43:23.801: ERROR/AndroidRuntime(23779): at android.bluetooth.BluetoothAdapter.getRemoteDevice(BluetoothAdapter.java:336)
09-06 13:43:23.801: ERROR/AndroidRuntime(23779): at it.gerdavax.easybluetooth.LocalDevice2Impl.getRemoteForAddr(LocalDevice2Impl.java:88)
But if I run the serial monitor in Amarino, it will read the data from the ArduinoBT just fine.
I just tried and worked great, following carefully all u mentioned.
Just want to know, the value show, what is it? milivolts?
Thank you, now I can play with my android phone and my old arduino projects
Is there a more affordable bluetooth modem? Couldn’t you have used a bluetooth sheild like this one? http://iteadstudio.com/store/index.php?main_page=product_info&cPath=18&products_id=307
I’m just getting into all this so it may be a dumb question. But $17 is a lot better for me than $64 so if it would work that would be my preference.
$17 is way too expensive. $11 with shipping included by getting one from ebay. ($7 if you don’t need the carrier board.) It even included a cable.
Whenever I open sensorgraph application , I get an eroe message, “Amarino 2.0 force close”. please let me know the solution
Hi, I understand that bluetooth has a various of profiles, I have one bluetooth module featured with serial port profile(SPP), do you have any idea if it can pair with computer? is there any settings that I should do?
Thanks.
You can pair with your computer and send commands from computer as you send from smart phone. You have right bluetooth module. It should have SPP.
Hi! I’m beginner in this, but I’m very interesed in this use of arduino, I have one question which should not be difficult for you. I wonder, is there a different type of communication between arduino and phone instead of bluetooth? I actualy want to make some kind of control with this but condition is that it is applied in long distance between these two. So far I’m only aware of bluetooth. I know it could be done with arduino itself using Ethernet shield, but I want android app to use instead. Thank you! Hope of getting your answer soon!
Hello, these days I am focusing on Bluetooth based projects only. I already have several bluetooth related projects on pipeline to publish on buildcircuit.com. Currently, I have not made any Android application for controlling via 3G or Wifi, however, I recommend you to check http://www.amarino-toolkit.net and join their group(http://groups.google.com/group/amarino-toolkit?pli=1). They usually discuss about such applications, may be you will get some ideas from there.
You can also ask this website: http://www.domotichome.net/
However, sooner or later I will publish such articles also, but you will have to wait for that. I am sorry for today. If I find such source codes on other sites, I will definitely inform you.
Thank you very much, you are very polite, I actually am just starting with android, so I find your work very usefull and is very well writen, hope I can manage with this project I’m starting, be very thankfull f you keep me informed!
I follow the instructions to do java program.But run into a problem.
It appears 3 errors and one warnning.
error messages
1.The method onProgressChanged(SeekBar, int, boolean)
of type MultiColorLamp must override a superclass
method
2.The method onStartTrackingTouch(SeekBar) of type
MultiColorLamp must override a superclass method
3.The method onStopTrackingTouch(SeekBar) of type
MultiColorLamp must override a superclass method
Warnnings
1.Attribute minSdkVersion (3) is lower than the
project target API level (7)
What do they mean? How am I suppose to do to correct them?
Thanks
Hi,
I am using a htc desire -android 2.2(froyo) device .i want to get data from a sensor to the device is it possible by the way you just showed.My concern is (Froyo comptiblity with arduino and amarino).Waiting for a reply
Hey there,
when i insert the Amarino_v0_55.jar i get the errors:
1.The method onProgressChanged(SeekBar, int, boolean)
of type MultiColorLamp must override a superclass
method
2.The method onStartTrackingTouch(SeekBar) of type
MultiColorLamp must override a superclass method
3.The method onStopTrackingTouch(SeekBar) of type
MultiColorLamp must override a superclass method
need some help please!!!
Hello!
I connnect my Galaxy Nexus (4.0.4.) to my Mac and i run the SensorGraph Peoject “as android project”. The app is send to my phone – but i can’ open it, it always crashes. Any ideas?
I uses API level 15 (4.0.3.).
Hi, make sure the jar file is in a libs folder in the main directory where you store all your projects. This solved the crashing issue in my case. See the link below for more details:
http://groups.google.com/group/amarino-toolkit/browse_thread/thread/c5e0667b9f351508
It seems a number of people are experiencing this No class def found error, as I was, even though I had the AmarinoLibrary_v0_55.jar as a library on the build path. For some reason the classes were not getting added to the apk file when built. I solved the problem by going, under eclipse, to the project properties, java build path, “Order and Export” tab, and checking the AmarinoLibrary jar file. Actually I checked all the entries including Android 2.3.3 and Android Dependencies, and moved the Amarino library to the top, then click ok. After that I could run the SensorGraph project as an Android Application on my phone and it worked.
Amazing.
This worked!
Just moved the Amarino library to the top and it worked!
Wow man! Nice one!
Thanks
I don’t know if anyone had a noclassdeffounderror, but the solution to this problem is to put the AmarinoLibrary_v0_55.jar file in a folder named “libs” inside the project folder and after that add the jar file to the build path, this is the only way I found to solve this problem. Hope I can help future programmers with the same problem.
Hi. I am having a devil of a time getting this to run. To be fair, I don’t know Adruino, Bluetooth, Amarino or Eclipse so having trouble is not a suprise.My phone is a Samsung Galaxy S running CleanGB (Firm 2.3.6) Kernal 2.6.35.7-CleanGB-MTD-g6d33744. When I run sensor graph it seems to open then suddenly it closes and a force close dialog appears. The CAT Log says:
07-28 01:16:48.980: E/AndroidRuntime(1492): FATAL EXCEPTION: main
07-28 01:16:48.980: E/AndroidRuntime(1492): java.lang.NoClassDefFoundError: at.abraxas.amarino.Amarino
07-28 01:16:48.980: E/AndroidRuntime(1492): at edu.mit.media.hlt.sensorgraph.SensorGraph.onStart(SensorGraph.java:73)
07-28 01:16:48.980: E/AndroidRuntime(1492): at android.app.Instrumentation.callActivityOnStart(Instrumentation.java:1129)
07-28 01:16:48.980: E/AndroidRuntime(1492): at android.app.Activity.performStart(Activity.java:3791)
07-28 01:16:48.980: E/AndroidRuntime(1492): at android.app.ActivityThread.performLaunchActivity(ActivityThread.java:1624)
07-28 01:16:48.980: E/AndroidRuntime(1492): at android.app.ActivityThread.handleLaunchActivity(ActivityThread.java:1667)
07-28 01:16:48.980: E/AndroidRuntime(1492): at android.app.ActivityThread.access$1500(ActivityThread.java:117)
07-28 01:16:48.980: E/AndroidRuntime(1492): at android.app.ActivityThread$H.handleMessage(ActivityThread.java:935)
07-28 01:16:48.980: E/AndroidRuntime(1492): at android.os.Handler.dispatchMessage(Handler.java:99)
07-28 01:16:48.980: E/AndroidRuntime(1492): at android.os.Looper.loop(Looper.java:130)
07-28 01:16:48.980: E/AndroidRuntime(1492): at android.app.ActivityThread.main(ActivityThread.java:3687)
07-28 01:16:48.980: E/AndroidRuntime(1492): at java.lang.reflect.Method.invokeNative(Native Method)
07-28 01:16:48.980: E/AndroidRuntime(1492): at java.lang.reflect.Method.invoke(Method.java:507)
07-28 01:16:48.980: E/AndroidRuntime(1492): at com.android.internal.os.ZygoteInit$MethodAndArgsCaller.run(ZygoteInit.java:842)
07-28 01:16:48.980: E/AndroidRuntime(1492): at com.android.internal.os.ZygoteInit.main(ZygoteInit.java:600)
07-28 01:16:48.980: E/AndroidRuntime(1492): at dalvik.system.NativeStart.main(Native Method)
I have tried to read teh fourms but am so lost I don’t know where to begin. I would be grateful if someone could provide some direction.
Thanks.
Thanks for this awesome tutorial. I am completely new to Android and this has been the most informative. After I right click on your SensorGraph folder and > Run as Android Application. I receive the following “Your project contains errors” with the ‘at’ underlined.
import at.abraxas.amarino.Amarino;
import at.abraxas.amarino.AmarinoIntent;
Any Ideas?
Thanks in advance
Never mind. I found my own issue. You clearly state to include the .jar file. I chose not to and paid for it, LOL.
Thanks again for the tutorial
IMPORTANT!! I followed exactly the instructions on here and i kept getting an error about something like “no make file for target all” so i rechacked that i added the external amarinolibraryv_05 jar file but still no luck so after hours i thought maybe i should rename the jar file to just AmarinoLibrary.jar and i cleaned the project and it finally did the build and ran so HOPEFULLY this might save someone some head banging on the wall
does the resistance value matters?
Also please could u tell how to attach a ultrasonic sensor(HC-SR04) in this circuit ?
Hi,
I have 2 problems,
1) In the new eclipse there is no option for “new android project” there is one “new android project application” whereas in that u cannot add an existing project, so i tried the “new android project with existing code” however in this option it adds the android 4.2 build how can i change that.
2) How to connect a ultrasonic sensor (HC-SR04) in the circuit.
Please i would really appreciate the help.
Hi…
I want to use the input from arduino to android mobile for processing app on mobile.
I want control a movie from arduino and movie will play by processing app on mobile.
thanking you in anticipation
Hello
Thank you for the well organized demonstration.
I am new to the Eclipse… when I try the “run as–> application” function I keep getting
an error message: “Your project contains errors..”
as I look at the code it seems that the error is in the line that states:
“private static final String TAG = “SensorGraph”;”
and when I point on the side of the line, the error message is:
“The value of the field SensorGraph.TAG is not used”
and this is after I included the .jar file…
I would appreciate your help
“SensorGraph using android, amarino and arduino | BUILD CIRCUIT” was indeed a good blog
post and I actually was in fact very joyful to
discover the blog. Regards-Celeste
I’m using the general bluetooth adapter which has a baud rate of 9600. I tried connecting with the amarino app, but it says ‘connection failed’, even after entering the pin code.
Do you mind if I quote a few of your articles as long
as I provide credit and sources back to your blog?
My blog is in the very same niche as yours and my users would
genuinely benefit from a lot of the information you provide here.
Please let me know if this okay with you. Thank you!
Yes, you can do that. But, please provide credit and sources. Please also write me on which website are you writing.
im using bluetooth shield from seedstudio, is this tutorial can be use to my BT shield?
and what about the DEVICE_ADDRESS for bluetooth shield from seedstudio?
I don’t know everything is looking fine, I’m using HC-06 Bluetooth, but graph is not displaying… Only white screen in two division one is empty and another diplaying text “Hello World, SensorGraph!” 🙁
My phone is Nexus5 kitkat 4.4.4…
My board is Arduino mega ADK R3
If I make debuggable as “True”
There is an error occurred.
–> It says that there is an error.
If I changed debuggable as nothing, the .apk file is made.
However, It doesn’t work as I wanted. There is no change at all.
Anyone can help me out?