


Multi color Lamp using Amarino, Android and Arduino
This tutorial is for novices who have never made any Android application or worked with Amarino. If you have never done any experiment with Android and Arduino, please start with this experiment.
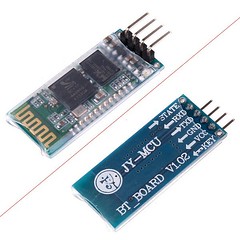
You don’t need to have previous knowledge of Android for doing this experiment. Simply download any Android serial emulator and upload the Arduino code and send/receive between Arduino and Android. For that experiment, you can use any kind of Bluetooth adapter, for example, BlueSMiRF or general Bluetooth adapter. If you are not confident, start with a cheap Bluetooth module, BUY HERE.
After doing this experiment, go for Amarino, because the core of Amarino is based on the experiment stated above. I strongly recommend you to work with SensorGraph project before you start doing the Multicolor lamp project. For doing SensorGraph project, please click on the following link: How to make SensorGraph
We need the following components for Multicolor lamp experiment:
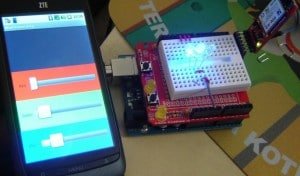
a. Android Smart Phone- I used ZTE Blade. Any kind of Android phone should work.
b. Arduino Duemilanova ATmega 328
c. Eclipse IDE for Java EE Developers
d. Androidsdk
e. Amarino Toolkit
f. Bluetooth Modem – BlueSMiRF from sparkfun or any other Bluetooth Adapter. BUY ONE
g. Three LEDs- Colors: RED, BLUE and GREEN, OR one RGB LED.
Step 1 Install Amarino
Go to http://www.amarino-toolkit.net/ and download the following applications on your mobile phone
a. Amarino – Android Application– to be installed on phone.
b. Amarino Plug-in Bundle– to be installed on phone.
c. Amarino Library– To be installed for Android programming. It is needed while installing the application on phone using Eclipse.
Step 2 Download Meet Arduino Library
Download the MeetAndroid Library and place it into the libraries folder of Arduino.
After placing the folder into the libraries folder, you should be able to access all the Amarino files through the Arduino programming environment.
You can see the picture below (Click on the image to enlarge it):

Step 3 Set up Bluetooth adapter
For this experiment, you can either use BlueSMiRF Bluetooth module (from sparkfun) or a general Bluetooth module from buildcircuit.net
Amarino is perfectly compatible with both of these modules. BlueSMiRF adapter is expensive than the general one, so, I recommend to buy the general one. BUY HERE
Connect the Bluetooth adapter in the following way:
Step 4 Test the communication between Bluetooth adapter and Arduino
Step 5 Set up Eclipse
Step 6 Download the Multicolor Lamp folder
Step 7 Work with Multicolor Lamp
NOTE: you need to have Androidsdk plugin installed.

– Select ‘create from existing source’.
– Use the browse button to find your Multicolor Lamp folder that you just downloaded.
– Select android 2.1 OR any other versions as the targeted device from the list. It depends upon the phone you use.
Click Finish.
*You might get yellow exclamation warnings next to your MulticolorLamp project, it doesnot affect your project, so, just ignore it.
*If you have a red “X” you might need to make you have your “AmarinoLibrary_v0_55.jar ” file is included. Download it from http://www.amarino-toolkit.net/index.php/download.html
*To include the file, right click on your Multicolor Lamp folder and click build path > configure build path > libraries > add external jar > and browse for the AmarinoLibrary_v0_55.jar file. > ok

**Very very Important- Open the MultiColorLamp.java file in Eclipse and place your bluesmirf device number inside this line of code ( private static final String DEVICE_ADDRESS = “YOUR BLUE TOOTH DEVICE NUMBER”;)

** Changing AndroidManifest.xml file. Go to Application and set Debuggable as ‘True’.

Phone side (HOW TO INSTALL THE APPLICATION)
Your phone should already be connected via usb to your computer, In your phone settings, developer debug mode, and install from unknown sources checked.
In my phone, it was in settings>applications>USB debugging.


Next, right click on your MultiColorLamp folder and > Run as Android Application.

When the dialog box of the AVD manager launches select your phone as the targeted device. It will be the one that does not say emulator and probably have some device number to it.
Launch
This will install the Multicolor Lamp app to your phone and run it.
NOTE: If your application does not install on the phone, then there is a possibility that your phone’s device driver is not installed on computer. Go to Device manager and install the driver for your phone. If you have internet connection, it searches automatically for the driver. You can get more information from here: http://developer.android.com/guide/developing/device.html
Arduino Side
You can get Arduino code file on one of the folders of MultiColor Lamp. Set the same baud rate that you have in Bluetooth adapter.
While uploading the sketch to Arduino, remove the RX and TX connections of Bluetooth module.

The Arduino set up is very easy. You just need to connect 3 LEDs across DIG 9- GND, DIG 10- GND and DIG 11-GND.
If you have never done this kind of experiment before, I recommend you to do this experiment first:http://arduino.cc/en/Tutorial/Fade
– After uploading the sketch and fixing the circuit, connect the Bluetooth module. Connection of Bluetooth module has been described earlier in this tutorial.
If you follow the instructions carefully, your experiment will work. Please write me if you have any problem. You can watch the project in action on the following video:
Check your experiment
1. Did you edit the MAC address?
2. Did you set ‘Debuggable’ as True in AndroidManifest.xml ?
3. Did you see if the baud rate written in your Arduino program is same as baud rate of Bluetooth adapter. If you are not sure about the baud rate, you can check it, see the following tutorial.
Please note that the baud rate of general bluetooth adapter is always 9600bps.
4. Did you connect the bluetooth module in the correct way?
THIS PROJECT WORKS PERFECTLY WELL. ONE OF THE VISITORS HAS SENT THIS PICTURE.

READ ABOUT MULTICOLOR LAMP WITH CUSTOM BLUETOOTH ID.
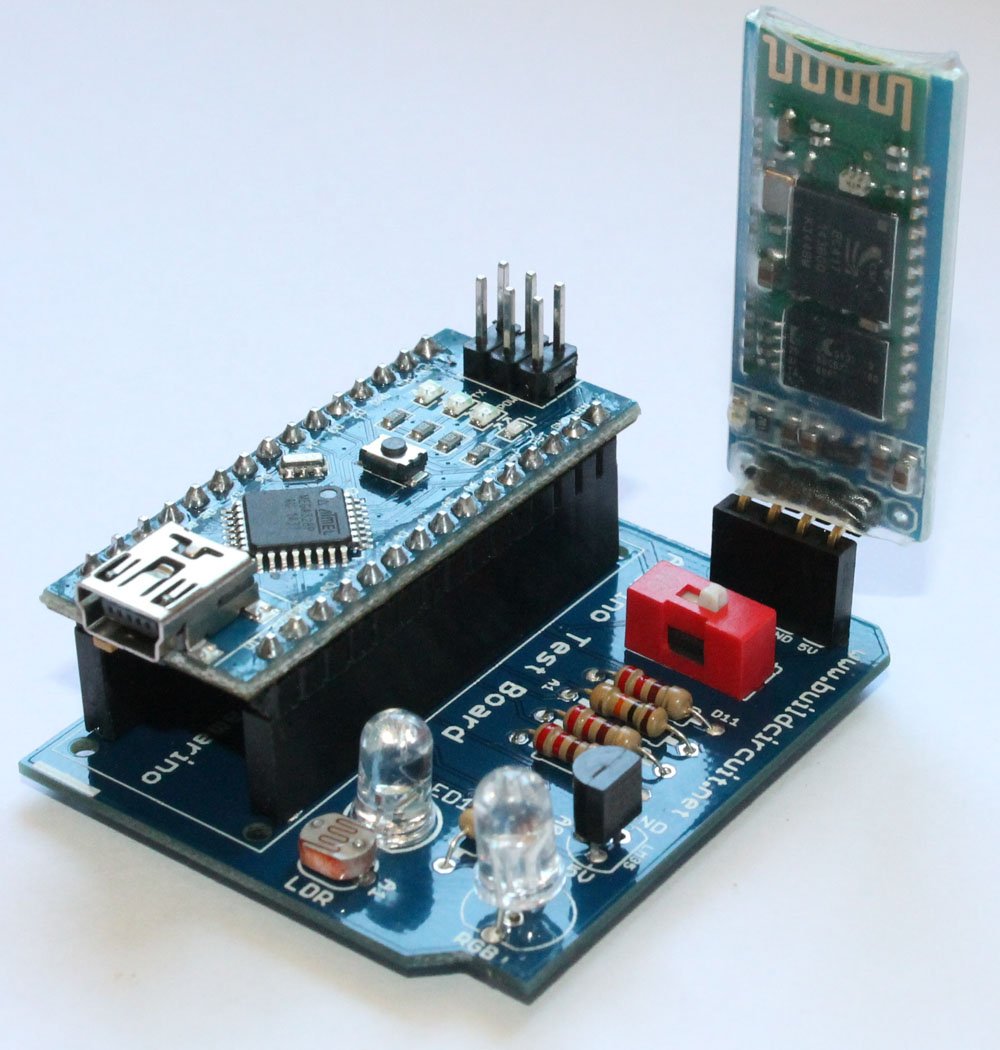
BUILDCIRCUIT.COM HAS RELEASED A DIY SHIELD FOR AMARINO, CHECK THIS OUT.
![]()

🛠️ Dive into our collection of DIY Kits, 🔊 Audio Amplifiers, Digital Scoreboards, FM transmitters, and more!
🎶 Explore endless possibilities at our new store.


You didn’t use a resistor in your circuit. Too much current is going thru the LEDs and they’re going to burn out after a short while if you keep using it like that. A 150 Ohm resistor for each LED would work just fine.
Yes, you can put 150- 250Ohm resistor.
I did all of them, I can connect to bluetooth but arduino didn’t recieve my command. What can be wrong?
I am sure that you will get all your answers here:
http://groups.google.com/group/amarino-toolkit?pli=1
I strongly recommend you to join this forum.
Hi! Can i use this arduino in this tutorial?
http://produto.mercadolivre.com.br/MLB-200948222-arduino-duemilanove-bluetooth-_JM#!description
can i use an other BT device for this project or only the bluesmirf device?
I believe that you can also try with other bluetooth devices, but the main point is to have a serial communication(RS232) with the microcontroller. You need to have TX and RX pins, that’s all. So, before you buy a module, read the specifications of both modules. However, it is always easier to try with a tested module and later try with something new.
Firstable thank you for that post , it has been very helpful to me.
I’ve done all the steps you say there, but when I try to “run as android application” it shows me those errors. Everything else worked.
Error generating final archive: java.io.FileNotFoundException: xxxbinresources.ap_ does not exist
Unparsed aapt error(s)! Check the console for output.
could you tell what can be wrong ?
Thank you!
Hey, thanks a million for the great tutorial! I got your example running on my Arduino Uno with the Bluetooth shield from iteadstudio (v2.2) and a HTC Legend (Android 2.2) without problems. 🙂 Here is a picture of my setup: http://i.imgur.com/qSl32.jpg
Thanks for sharing!
excellent tutorial! only one question: what if i dont want to use the BT module and i only have the usb cable?
I will soon write tutorial about how to control the lamp with USB cable. Thanks for the comment.
I run the application and it has stopped unfortuantly. Where ‘s the problem??
Hi, im using HTC Desire HD 2.3.5 …i cant install the Multicolor Lamp app on my phone. Its says on eclipse that it has succesfully installed the apk in to my device…But i don’t see the app in my HTC…need help asap! thanks!!!
Hello, If it doesn’t work, please try from this post: http://www.buildcircuit.com/amarino-based-multicolor-lamp-with-custom-mac-address/
If you cannot run the application from eclipse now, you can still download the application with custom MAC id from here:
http://code.google.com/p/from-arduino-to-android-to-arduino/downloads/detail?name=MultiColorLamp-1.apk&can=2&q=
Please remove the previous installations before you install this.
My phone also has Android 2.3.5, and it works well.
Best of luck.
Hi, thanks for your prompt reply..i can now have the app. But when i upload the code to the Arduino Uno, the red light doesnt light up, cause from the code, once loaded, the red LED will light up right? I had tested on the default led on pin 13, it light up, so i guess my wire connection cant be wrong.
And I have already changed my Bluesmirf baudrate to 57600. Any idea whats wrong? Im stuck now. Does the baudrate matter?
Omg..i managed to make it work ! thanks alot…
Hi, has anyone of u encountered problem updating a new sketch? i tried changing the pin from 9 to 10 in the code, uploaded the sketch but it just doesnt override the previous code. My LED still function from pin 9 and not 10. Any one has an answer?
I’ve done all the steps you say there, but when I go to the step 7,after I open the MultiColorLamp.java it shows me three errors:
The method onProgressChanged(SeekBar, int, boolean) of type MultiColorLamp must override a superclass method MultiColorLamp.java /MultiColorLamp/src/edu/mit/media/amarino/multicolorlamp line 115 Java Problem
The method onStartTrackingTouch(SeekBar) of type MultiColorLamp must override a superclass method MultiColorLamp.java /MultiColorLamp/src/edu/mit/media/amarino/multicolorlamp line 124 Java Problem
The method onStopTrackingTouch(SeekBar) of type MultiColorLamp must override a superclass method MultiColorLamp.java /MultiColorLamp/src/edu/mit/media/amarino/multicolorlamp line 129 Java Problem
could you tell what can be wrong ?
Thank you!
i managed to make it work when i delete @Override,thanks all the same!
hey ,
Can u give a tutorial with the use of usb instead of bluetooth please.
it works, but i had to change some things.
1. I downloaded the apk from http://code.google.com/p/from-arduino-to-android-to-arduino/downloads/detail?name=MultiColorLamp-1.apk&can=2&q=
i put my bluetooth mac adress in the textbox
2. I loaded mulicolorlamp into arduino IDE , but i changed this part
meetAndroid.registerFunction(red, ‘o’);
meetAndroid.registerFunction(green, ‘p’);
meetAndroid.registerFunction(blue, ‘q’);
to this one
meetAndroid.registerFunction(red, ‘r’);
meetAndroid.registerFunction(green, ‘g’);
meetAndroid.registerFunction(blue, ‘b’);
and thats all … 🙂
Anyone have a simple eclipse and arduino to on off an 8 LED? i really wana try control in with android bluetooth to arduino. Any willing to share can mail me any url or source code. Thanks hack4fun.fun@gmail.com
Sir does this thing work on Asus Eee pad transformer tf101 – Android 4.0?
i followed everything but when im going to run as android application in my tablet it says that MultiColorLamp has stopped working..
please help.. :((
Hi! I was trying the multiColorLamp example, but I have a small issue. It crashes after installation.
In the beginning I have and error in the manifestfile. in the line for setting up the sdk .it was set to minSdkVersion=”3″ and android:targetSdkVersion=”4″ , and of couse i was not able to upload the program to my phone, but after modifying it to :
android:minSdkVersion=”2″
android:targetSdkVersion=”16″ corresponding to my target device running on android 4.04, the error disappear and I am able to upload the code. But now the app crashes after launching.
Can you give a hand with it?
Thanks in advance
Marcelo
I recommend you to join Amarino group: https://groups.google.com/forum/?fromgroups#!forum/amarino-toolkit
This group will definitely help you in solving your problem.
hi , i m trying to make an android app to receive sensor data from arduino.
i m following the steps from multicolor lamp tutorial checked for everything.
but i cant get android to connect with bluettooth.:S
package edu.mit.media.hlt.sensorgraph;
import android.app.Activity;
import android.content.BroadcastReceiver;
import android.content.Context;
import android.content.Intent;
import android.content.IntentFilter;
import android.os.Bundle;
import android.widget.TextView;
import at.abraxas.amarino.Amarino;
import at.abraxas.amarino.AmarinoIntent;
public class SensorGraph extends Activity {
private static final String TAG = “SensorGraph”;
private static final String DEVICE_ADDRESS = “00:11:11:22:07:85″; //”00:06:66:03:73:7B”;
private TextView mValueTV;
private ArduinoReceiver arduinoReceiver = new ArduinoReceiver();
@Override
public void onCreate(Bundle savedInstanceState) {
super.onCreate(savedInstanceState);
setContentView(R.layout.main);
mValueTV = (TextView) findViewById(R.id.value);
}
@Override
protected void onStart() {
super.onStart();
// in order to receive broadcasted intents we need to register our receiver
registerReceiver(arduinoReceiver, new IntentFilter(AmarinoIntent.ACTION_RECEIVED));
Amarino.connect(this, DEVICE_ADDRESS);
}
@Override
protected void onStop() {
super.onStop();
// if you connect in onStart() you must not forget to disconnect when your app is closed
Amarino.disconnect(this, DEVICE_ADDRESS);
// do never forget to unregister a registered receiver
unregisterReceiver(arduinoReceiver);
}
public class ArduinoReceiver extends BroadcastReceiver {
@Override
public void onReceive(Context context, Intent intent) {
String data = null;
// the device address from which the data was sent, we don’t need it here but to demonstrate how you retrieve it
//final String address = intent.getStringExtra(AmarinoIntent.EXTRA_DEVICE_ADDRESS);
// the type of data which is added to the intent
final int dataType = intent.getIntExtra(AmarinoIntent.EXTRA_DATA_TYPE, -1);
// we only expect String data though, but it is better to check if really string was sent
// later Amarino will support differnt data types, so far data comes always as string and
// you have to parse the data to the type you have sent from Arduino, like it is shown below
if (dataType == AmarinoIntent.STRING_EXTRA){
data = intent.getStringExtra(AmarinoIntent.EXTRA_DATA);
if(data != null){
mValueTV.setText(data);
try {
// since we know that our string value is an int number we can parse it to an integer
final int sensorReading = Integer.parseInt(data);
mGraph.addDataPoint(sensorReading);
mValueTV.setText(sensorReading);
}
catch (NumberFormatException e) { /* oh data was not an integer */ }
}
}
}
}
}
It appears that the default speed of the dx module is (JY-MCU Arduino Bluetooth Wireless Serial Port Module) is 9600bps. I installed all the amarino apk files and used the precompiled multicolorlamp apk.
As user Alvaro, I had to change the following lines in the arduino program:
meetAndroid.registerFunction(red, ‘o’);
meetAndroid.registerFunction(green, ‘p’);
meetAndroid.registerFunction(blue, ‘q’);
to these:
meetAndroid.registerFunction(red, ‘r’);
meetAndroid.registerFunction(green, ‘g’);
meetAndroid.registerFunction(blue, ‘b’);
And had to change the Serial.begin(57600); to: Serial.begin(9600);
Finally, i’ve read the physical adress from within the amarino android program, and i’ve set it in the multicolorlamp app.
That’s true. the default baud rate is 9600bps.
everything works but when i try to run as android app it says” Unfortunately, mulitclorlamp has stopped”
I had the same problem. Try this: Right click on Multi Color Lamp, then click on build path, configure build path, order and export tab, check the box next to the Amarino Library v0_55.jar and move it to the bottom of the list. I don’t know why this worked, but it did. On the other hand, in order for the Sensor Graph app to load on my phone, I had to move the .jar file to the top of the list.
Thanks for your answer, this works for me
Hey there,
whats/wheres the program which has to be uploaded to the arduino?
thanks
I installed Eclipse the way the Instruction told me. When I open MultiColor Lamp it shows:
” [2013-06-02 22:50:19 – MultiColorLamp] Unable to resolve target ‘android-8’ ”
In the Manifest.xml appears:
” Multiple annotations found at this line:
– tag appears after tag
– Not targeting the latest versions of Android; compatibility modes apply. Consider testing and updating this version.
Consult the android.os.Build.VERSION_CODES javadoc for details. ”
Can I ignore this notes?
Seems to are notes which can be Ignored.
How do I get my “bluesmirf device number”? This part is missing somehow…
ah, device number is shown in amarino!
First it didn’t run on my smartphone aswell, then i tagged every box left of the names in “build path -> configure build path -> java build path -> order and export” and now it works fine. COOL!
Hi, this is my first time trying to use android, i do all the steps that you put in this page and my program doesnt have any mistake, but when i try to download to my phone I cant, I download all the apis but i still have the problem, could you help me, I give my thank for your answers
hi i am using a samsung galaxy young model gt-s5360l using android 2.3.5 but when I run the app multicolor this crash, in fact when I uses the test this works correctly, then i dont understand what is the problem, could you help me
hye there, i got some problem over hear,, i managed to built the app and display color meter on my xperia e dual. the problem is the rgb light i used keep on lightning and fail to follow the app’s command.. i had also connected the amarino with the bluetooth.. please help me tq
i want to buy it (plate and bluetooth) in taiwa, do you have any supply
in taiwan i can tontact with .
thanks
Yes, we ship it from Finland. You can buy the module from this link: http://www.minibread.com/amarino/31-bluetooth-module.html