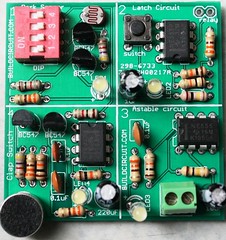
4 in 1 DIY kit schematic
Kit making Photos: http://www.flickr.com/photos/buildcircuit/sets/72157631683001494/
KIT MAKING VIDEOS AVAILABLE ON: http://www.youtube.com/playlist?list=PL0GelaJ0OBT11j43FhrPFlRy5geHVWomL
1. Dark sensor:
Description: As you block light falling on the LDR, the LED D1 switches ON. As soon as you put lights on the LDR, the LED goes off.
Extra experiment: The sensitivity of the circuit depends upon the value of resistor R3. If you replace the resistor R3 (4.7K) with some other resistor, for example 330 Ohm, it becomes highly sensitive to darkness and if you increase the resistance beyond 4.7K, it gets less sensitive to darkness. You can try it.
For more information:
http://www.buildcircuit.com/dark-sensor-using-two-transistors-buildcircuit/
2. Latch Circuit
Description: When you press the tactile switch, the LED D2 switches on and when you press it again, the LED switches OFF. This is bistable mode of NE555 timer.
See how to make this circuit on breadboard.
Extra experiment: You can do a simple experiment with relay also. You can make a light operated switch with this circuit.
The schematic for the circuit is given below:
In this experiment, when you press light falling on the LDR, the relay gets activated and switches on the LED2. Here, relay operates exactly like the tactile (momentary) switch.
3. Astable Mode:
Description: In this experiment, the LED3 blinks according to the values of R3, R1 and C2. It has been configured in the astable mode of 555 timer.
Read more about astable mode: http://www.buildcircuit.com/astable-mode-of-555-timer/
Extra experiment:
You can make an Infrared transmitter with this kit by just changing the values of resistors.
Schematic for IR transmitter is given below:
Read more about infrared transmitter: http://www.buildcircuit.com/astable-mode-of-555-timer/
4. Clap switch
Description: When you clap close to the electret microphone, it switches the LED4 ON for a while and switches off again.
When you clap, the circuit triggers pin 2 of NE555 timer and takes it to monostable mode.
The ON time is determined by the values of resistor R2 and capacitor C1. The timing is 1.1xR2xC1.
You can alter the timing of the circuit by changing the values of resistor R5 and capacitor C1. You can try with 100K and 100uF.
Read more about monostable mode: http://www.buildcircuit.com/monostable-module/
-
4 In 1 DIY Kit- Dark Sensor, Clap Switch, Latch Switch And Astable Multivibrator
US $10.50Add to cart4 In 1 DIY Kit- Dark Sensor, Clap Switch, Latch Switch And Astable Multivibrator
US $10.50This is a simple 4-in-1 do-it-yourself (DIY) kit from BuildCircuit. The kit has four different circuits that can be switched on separately or together at a time using a DIP switch.
The four circuits are: Dark sensor using LDR, A latch circuit using NE555 timer, Astable circuit using NE555 timer, A clap-switch circuit using NE555 timer.
28 in stock
Quick View
Check out other popular DIY Kits
-
2CH X 100W + 200W 2.1 Channels Bluetooth Audio Amplifier Board – TSA7500
US $59.95Add to cart2CH X 100W + 200W 2.1 Channels Bluetooth Audio Amplifier Board – TSA7500
US $59.95TSA7500 2CHx100W + 220W 2.1 channels audio amplifier board comes with AudioB pro Bluetooth module.
It has a perfect class-D architecture (based on TPA3221) and 2 channels have 100W power outputs and another one channel has 200W power output.
All the channels are capable of outputting nominal power simultaneously and continuously. This board can be powered by any DC 12V-30V power supply. It can be used to drive any 4Ω or 8Ω passive speakers.
123 in stock
Quick View -
LED Chaser Using NE555, CD4017, Infrared Receiver And Photoresistor
US $9.95Add to cartLED Chaser Using NE555, CD4017, Infrared Receiver And Photoresistor
US $9.95The kit does work normally like a normal LED chaser kit. In addition to its obvious features, it has a photoresistor that allows you to change the speed of the chasing LEDs. In the old LED chaser, the speed is controlled with a variable resistor. In this kit, we have used a photoresistor to work as a variable resistor. As the light falling on the photoresistor changes, the speed of the LEDs also changes.
22 in stock
Quick View -
CD4026- 1 Digit Up Counter Module
US $4.95Add to cartCD4026- 1 Digit Up Counter Module
US $4.95- It works as an UP counter. You can instantly test the up count of the display using a flashing LED.
- It is a handy tester for 0.56″ seven segments common cathode display.
- Works with Arduino or NE55 or whatever that gives pulse.
- You can concatenate as many displays as you want.
- With this, you can build your own digital objects counter.
- Size: 15mmx49mm
50 in stock
Quick View -
CD4029 Based Up And Down Counter For Arduino And NE555
US $7.95Add to cartQuick View -
3 Digit Digital Object Counter ASSEMBLED Kit With Infrared Transmitter And Laser Module
US $14.95Read more3 Digit Digital Object Counter ASSEMBLED Kit With Infrared Transmitter And Laser Module
US $14.95This is 3 digits digital object counter kit for electronics beginners and hobbyists. It is the upgraded version of our previous 2 digits and 3 digits object counter.
You can use this 3 digits digital object counter for counting objects or people entering in a room. It can be used by engineers for learning about digital counters.
This DIY digital object counter works with VS1838 infrared receiver and photoresistor and there are three seven segment displays displaying numbers from 0 to 999. An IR transmitter is directed towards the VS1838 infrared receiver of the counter module and objects are moved between the two modules. Each time an object passes between the two modules, the seven-segment displays show increment in numbers from 0 to 999.
Out of stock
Quick View -
LCD Shield For Arduino-Bluetooth Android Hobbyists
US $11.95Add to cartLCD Shield For Arduino-Bluetooth Android Hobbyists
US $11.95This LCD shield is designed for experimenters who are interested in Android- Arduino, and Bluetooth experiments.
Features:
- RGB LED
- A white 5mm LED
- Light-dependent resistor ( LDR) based light sensor.
- LM35DZ-temperature sensor.
- 16×2 LCD display.
- There is a header for HC-SR04 ultrasonic range finder.
6 in stock
Quick View -
1.8″ Photoresistor And Laser Operated Medium Digital Objects Counter
US $24.95Add to cartQuick View -
Photoresistor And Laser Operated Large Digital Objects Counter With 2.3″ Displays
US $29.95Add to cartPhotoresistor And Laser Operated Large Digital Objects Counter With 2.3″ Displays
US $29.95A laser light module illuminates the photoresistor continuously and whenever any object obstructs the laser light falling on the photoresistor, the counter increases the count. You can use this 3 digit digital objects counter for counting objects or people entering a room. It can be used by engineers for learning about digital counters.
4 in stock
Quick View -
2.3″ Common Anode Seven Segment Display Driver
US $19.95Add to cart2.3″ Common Anode Seven Segment Display Driver
US $19.95- This is a 74LS192 based up and down counter driver module for driving 2.3″ seven-segment display. The module has headers on two sides to receive up/down count signals and to concatenate with another driver module. You can concatenate unlimited displays.
- The module can be triggered with NE555, flashing LED, Scoreduino-A, basic trigger module, and Arduino. It can also be triggered by anything that generates a clock pulse.
- It works ‘strictly’ with 9V power supply. Do not exceed more than 9V.
9 in stock
Quick View -
2.3″ common cathode seven segment display driver
US $11.95 – US $12.95Select options2.3″ common cathode seven segment display driver
US $11.95 – US $12.95This is a CD4026 based up counter driver module for driving 2.3 inches common cathode seven segment display. The module has headers on two sides to receive up count signals and to concatenate with another driver module.
The module can be triggered with NE555, flashing LED, and Arduino. It can also be triggered by anything that generates a clock pulse.
Quick View -
SMD DIY Kit NE555 Oscillator CD4017 LED Chaser Circuit
US $4.95Add to cartQuick View
Hwwwwoooooooooo