


MP3 mode circuit- WTV020SD-16P Tutorial
Description:
This tutorial is about mp3 mode of WTV020SD-16P module. With this simple circuit, you can play AD4 format music files. At the end of the article, you can see a video output of this simple and easy project.
The following schematic shows the MP3 mode of WTV020SD module. The schematic and its operation has been better explained on its product manual.
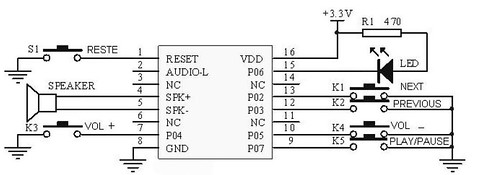
I followed the schematic but I connected only RESET, PREV and NEXT switches only for this experiment.
Steps:
a. Copy AD4 format music files on to your 2GB micro SD card.
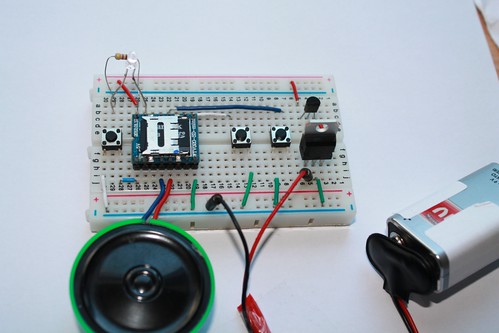
b. Connect speaker, 3.3V regulator, switches and power supply. See the connection on the image given below.
I used a 5V and a 3.3V regulators for this project. I noticed that the 3.3V regulator heats up heavily when connected to a 9V battery, so I connected the battery to a 5V regulator first and then to the 3.3V regulator. I used a 2GB microSD card for this experiment.
If you use a 6V battery, you can connect the power supply straight to 3.3V regulator.
If this is your first experiment with WTV020SD-16P module, I strongly recommend you to read this article. The recommended article explains about the size of micro SD card and audio formats.
The project works with a 2GB microSD card and AD4 format music files.
Click here to know how to convert a wave or mp3 format files to AD4 format.
Related Tutorials:
c. Mp3 mode and audio amplifier.
d. Basic circuit with Arduino- example 1.
e. Basic circuit (trig and select) example 2.
f. How to convert mp3/wave format files to AD4 format.
WATCH THE OUTPUT
Related photos and documents:
- Photos on FLICKR
- Datasheet of WTV020SD-16P
- Download SOMO tool for converting mp3 and wave files to AD4 format.
- Download AD4 sample files
- About WTV020SD-16P evaluation kit
DOWNLOAD AD4 FORMAT SAMPLE FILES- SET2-SAMPLES FILES 2 (NEW!!! uploaded on 15.1.2014)
Where to buy:
You can buy all the components for this experiment on www.buildcircuit.net. The web store is owned and operated by buildcircuit.com. Buildcircuit.com is a reliable webstore for amateurs. It sells low cost components and offers fast shipping service.
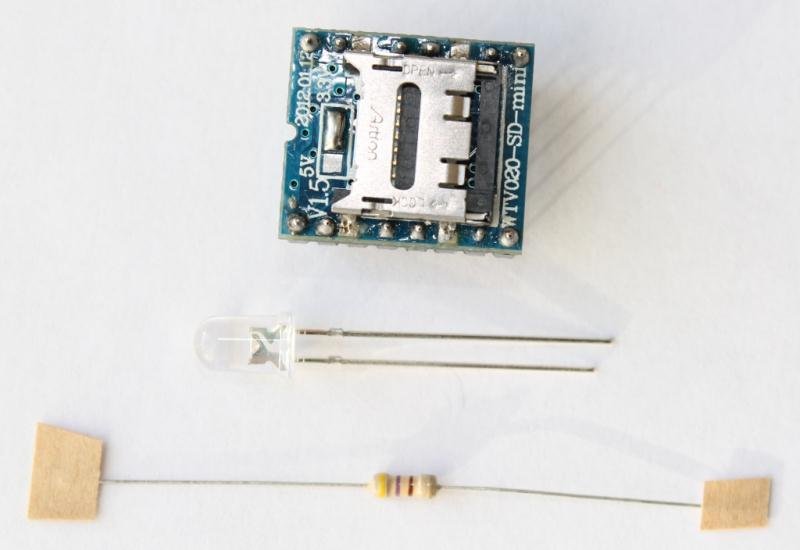
- WTV020SD-16P
- 3.3v regulator
- 5V regulator
- 2GB micro SD card
- Audio amplifier
- Speaker
- Tactile switch
- Wires
DO NOT USE 5V POWER SUPPLY FOR THE MODULE. 5V will burn both your MicroSD card and WTV020SD module.
Please use only 3.3V power, either from Arduino or use 3.3V regulator chip.
🛠️ Dive into our collection of DIY Kits, 🔊 Audio Amplifiers, Digital Scoreboards, FM transmitters, and more!
🎶 Explore endless possibilities at our new store.


I want to use this WTV020-SD-mini module in a jewelry box so it will play when the lid is open.
It will continue to play just 1 song untill the lid is closed. I hooked the device up to my arduino using your tutorial, and it works fine. But when I hook it up in the loop configuration in the spec sheet it won’t play. I don’t have room to include even a small arduino in the box. I need a circuit that will turn it on and play when a switch attached to the power is activated. Can you please help?
THANKS
Alan
PS thanks for the great tutorial.
Alan, I think you can use this device without arduino – it allows that. You simply have to connect right buttons 🙂 as shown on the circuit on the top of this page.
I am having trouble with my WTV020-SD-16P module. I have followed the circuits given above but I the speaker I have didnt sound. I’ve tried using a 1W, 8ohms speaker, a 3W, 1ohm speaker still I get the same problem. I even used an amplifier also to play the music from SD but all I hear is humming from speakers. One thing I am wondering also is everytime I put a supply of 3.3V to the module, the led connected to the busy port blinks only and sometimes it blinks first a few minutes then led turns on steady. it just turns off again when I click play and next button. What do you think is the problem?
my advice is … I have done a lot of attemp and finally, i found the solution. I did that..
steps.
1. I did schematic how is in this page. I just connect the push buttom next, previus and reset. that’s it.
2. I used two kind of brand of memory SD, I used a SAnd Disk 1GB and no NAME 2Gb. Those memory works me very well.
3. the most important step was give format to memory SD with the program called SD Formatter. i did this step without that program and it didn’t work.
4. the next step was pass the audio with format AD4.
5. Put the memory SD on module and complete … i’m enjoing my two modules.
I hope this advice can operate with you …