


About relay module for clap switch- operate 100-240V appliance

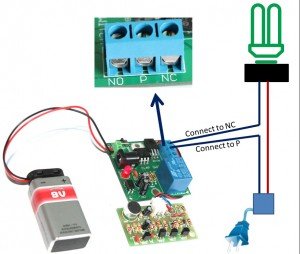
Description: This is a dependent DIY kit module that has to be used with a clap_switch available at BuildCircuit Store. This kit DOES NOT work independently as a clap switch. It is useless without this_clap_switch_kit. So, you need to order that kit also.
You can read about the clap-switch at this link.
![]()
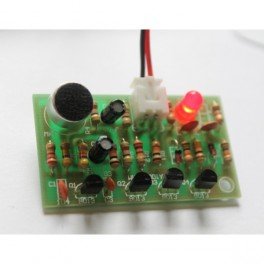
The relay module comes as a pack of parts kit and is easily assembled if you can follow the silkscreen indicators (labels) and have beginning experience with a soldering iron. You will need to read the resistor bands or use a multimeter to determine the resistor sizes. Both the kits operate with 9V batteries.

Features:
- A DIY kit module that works with this_clap_switch_kit. It is useless without the clap switch.
- Operates a 100-240V lamp with clap/loud sound.
- Supply voltage: 6V-9V. The same power supply can be used for this_clap_switch_kit.
- There are two supply input points: a DC barrel and a screw terminal. You can use one of the points to power up the kit.
- Dimension: 48.26mm x 49.53mm.
- Relay specification: Activation voltage: 5V DC. Controls appliances operating at 10A 250VAC, 10A 125VAC, 10A 30VDC, 10A 28VDC. Suitable for Europe, North America, Australia and New Zealand.
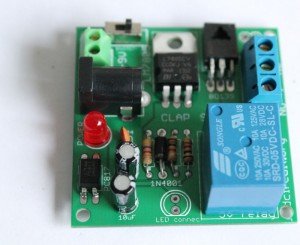
Schematic of relay module:
Click on the image to enlarge it.

The kit package contains the following components:
- 1 x Bare PCB with Silkscreen indicators
- 2 x 1K carbon film resistor
- 1 x 4.7K carbon film resistor
- 1 x 1N4001 diode
- 1 x LM7805
- 1 x BD139
- 1 x 0.1uF (code- 104)
- 2 x 10uF capacitor
- 1 x PC817 optocoupler
- 1 x SPDT switch
- 1 x 5V relay
- 1 x 3 pin screw terminal
- 1 x 2 pin screw terminal
- 1 x DC barrel
- 1 x 5mm LED
- 1 x 9V battery connector
![]()
Documents:
- Assembly tutorial
- Connecting clap-switch to the relay-module
- How to connect a lamp to the relay-module
- About relay-module for clap-switch
Video:
🛠️ Dive into our collection of DIY Kits, 🔊 Audio Amplifiers, Digital Scoreboards, FM transmitters, and more!
🎶 Explore endless possibilities at our new store.


